VLC is one of the most widely used applications for streaming IPTV channels, offering a versatile and user-friendly interface. As an open-source, cross-platform media player, VLC is compatible with various operating systems, including Windows, macOS, Linux, as well as mobile platforms like Android, iOS, Tizen, Windows 10 Mobile, and Windows Phone. Developed by the VideoLAN project, VLC is free to use and supports a wide array of media formats, making it a top choice for IPTV users.
In this tutorial, we will walk you through the process of recording live IPTV programs or desktop activities using VLC. This feature is highly beneficial for users who want to save their favorite TV shows, sports events, or other live broadcasts for future viewing.
How to Record IPTV on VLC
Step 1: Access the Convert/Save Option
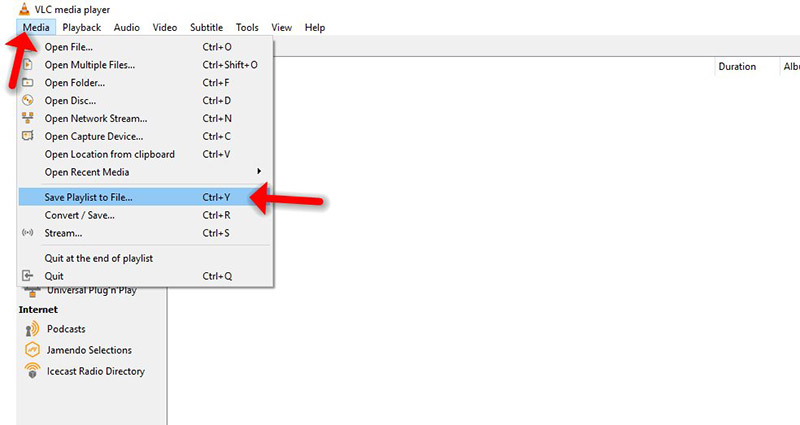
Open VLC Media Player, click on the “Media” menu at the top, and select “Convert / Save.” This option allows you to capture and save IPTV streams, desktop activities, or other media playing through VLC.

Step 2: Select the Capture Device
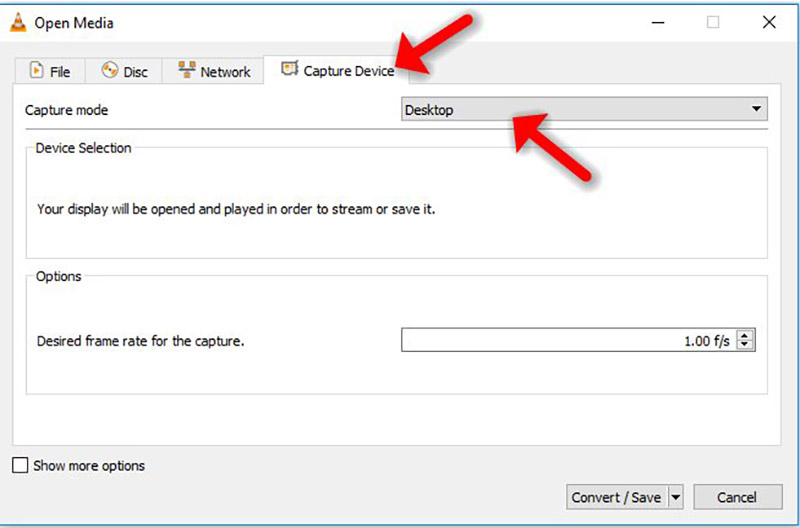
Navigate to the “Capture Device” tab. Under the “Capture mode” dropdown menu, select “Desktop” if you want to record your screen or IPTV stream.
Note: The default frame rate is set to one frame per second, which may result in a less smooth video. It’s recommended to increase the frame rate to at least 15 or higher for smoother recording, depending on the quality you desire. After adjusting the frame rate, click “Convert / Save” to proceed.

Step 3: Set the Destination File
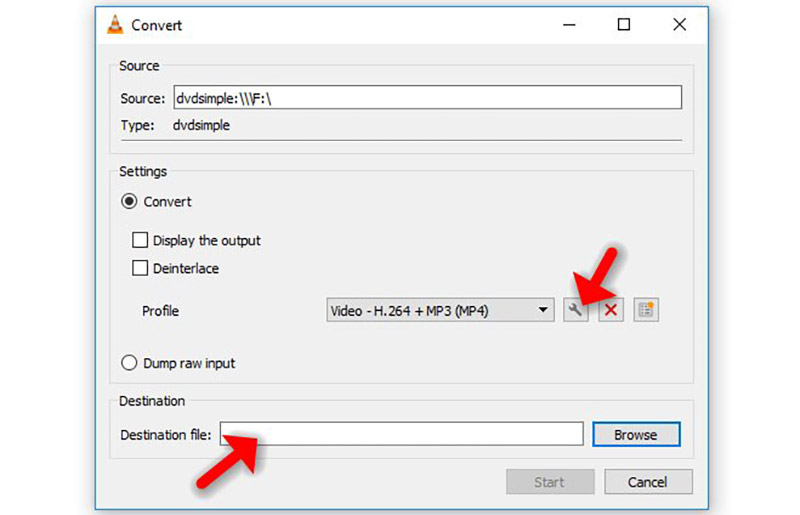
In the next step, you will need to choose the destination for your recording. Under the “Destination” section, browse and select the folder where you want to save your recorded file. You can also name the file here.
Additionally, there is an option to check the “Display the output” checkbox if you want to see your desktop or IPTV stream in the VLC window while recording. However, this is optional and not necessary for the recording process.

Step 4: Adjust Video Settings (Optional)
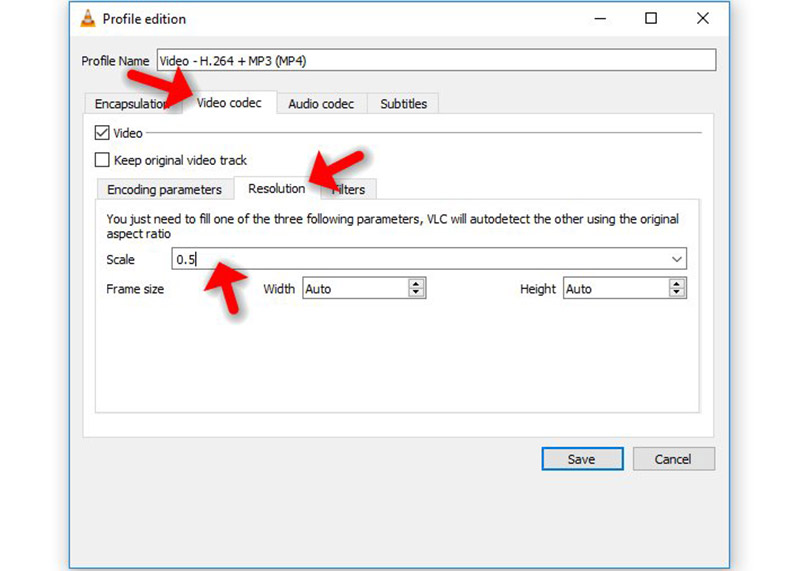
If you want to customize the resolution and video quality, click on the “edit” button located next to the Profile box. This will allow you to modify video and audio codecs, change resolution, and adjust other quality settings.
For instance, you can reduce the video resolution by scaling it down. Go to the “Video codec” tab, and in the “Resolution” section, enter a lower scale value (e.g., 0.5) if you want to create a smaller file size. This is useful for conserving storage or sharing the file online.

Step 5: Start Recording
Once you have configured the settings, click the “Save” button, then click “Start” to begin recording. VLC will now record the IPTV stream or desktop activity and save it to the designated location. During this process, you can continue using your computer normally, and VLC will quietly record in the background.
Step 6: Stop Recording and Save the File
When you are done recording, click the “Stop” button in VLC. Your recording will be saved in the location you selected earlier. You can now open the file to review the content. VLC allows you to play the recording, share it with others, upload it to platforms like YouTube, or even edit it with video editing software.
Additional Tips for Recording IPTV on VLC
- Optimize Frame Rate: Adjust the frame rate for better video quality. A higher frame rate provides smoother video, but may result in larger file sizes.
- Manage Storage: Be mindful of the storage space on your device when recording long IPTV streams, as these files can become quite large depending on the video quality settings.
- Check Compatibility: VLC supports multiple video formats such as MP4, AVI, and more. Ensure that your saved file format is compatible with the devices or platforms where you plan to share or view the recording.
By following these steps, you can effectively capture live IPTV streams or desktop activities using VLC, providing you with a flexible solution for saving and sharing your favorite content. Whether it’s a live sports event, a TV show, or simply a screen recording, VLC offers a reliable and efficient way to capture it all.
Factory Reset Steps for Your TVIP Box


